

1. Site Assessment and Pre-Installation Planning
For commercial projects, site assessment is not a formality—it directly determines structural safety, lifespan, and operating performance. Before any columns are anchored or louvers are mounted, experienced installers evaluate how the site will handle permanent loads, moving components, and long-term environmental stress. In large retail courtyards, hotel terraces, or mixed-use commercial plazas, this stage prevents costly redesigns later and ensures the louvered pergola system integrates smoothly with the building’s structure and daily operations.
For example, on a 120 m² hotel rooftop terrace, an early assessment revealed uneven slab thickness, which required localized reinforcement before installing the pergola columns—saving weeks of rework during installation.
1.1 Load-Bearing Requirements and Ground Conditions
Commercial pergola installations demand verified structural support, not assumptions. Engineers must confirm that the substrate—whether reinforced concrete, steel decking, or compacted ground—can support static weight, dynamic movement from adjustable louvers, and additional loads such as snow, rainwater, or integrated lighting systems.
On a shopping mall entrance project, a 6 × 5 meter aluminum pergola system added over 1,200 kg of distributed load once motors, drainage channels, and LED strips were included. The slab passed visual inspection, but core sampling revealed insufficient reinforcement spacing, requiring chemical anchors and steel base plates to redistribute the load safely.
Typical load benchmarks used during planning include:
| Assessment Item | Typical Commercial Requirement |
|---|---|
| Slab thickness | ≥ 150 mm reinforced concrete |
| Anchor pull-out resistance | ≥ 12 kN per anchor |
| Allowable deflection | ≤ L/250 under full load |
| Drainage slope | ≥ 1% toward outlets |
Ignoring these parameters risks long-term deflection, water pooling, or anchor failure, especially in high-traffic commercial environments where maintenance access may be limited.
1.2 Space Measurement and Layout Confirmation
Precise measurement ensures the pergola fits both structurally and visually within a commercial setting. Installers confirm clearances for pedestrian flow, emergency exits, façade elements, and adjacent storefront signage. Every millimeter matters when integrating pergola columns with existing architectural lines.
In a business park café renovation, a 4.8 × 3.6 meter pergola footprint had to align exactly with floor tile joints to maintain visual symmetry. A 30 mm misalignment would have forced column relocation, impacting underground drainage routes. By confirming layout lines before fabrication, the installer avoided on-site cutting and delays.
During layout confirmation, professionals typically:
-
Mark column centerlines using laser levels rather than tape measures.
-
Verify overhead clearance for fully opened louvers and motor housings.
-
Confirm maintenance access zones for motors and drainage outlets.
For projects incorporating an aluminum pergola house, early layout checks also ensure seamless integration with adjacent glazing systems and façade cladding without compromising waterproofing details.
1.3 Local Climate and Wind Exposure Considerations
Climate conditions dictate design choices long before installation begins. Wind exposure, rainfall intensity, and temperature variation all influence column spacing, louver thickness, and motor selection. Coastal commercial sites often face salt-laden air and sudden gusts, while inland city centers may experience heat buildup and thermal expansion.
On a seaside restaurant terrace, a 5 × 4 meter pergola installation had to withstand wind gusts exceeding 120 km/h. The planning team adjusted column spacing and selected reinforced louvers to prevent vibration under partial opening conditions. In contrast, a downtown office courtyard prioritized heat dissipation and drainage efficiency to handle short, heavy rain events.
When projects include motorized aluminum pergola systems, planners also account for:
-
Wind sensors that trigger automatic louver closure
-
Drainage capacity during sudden downpours
-
Expansion gaps to accommodate seasonal temperature swings
Correct climate evaluation ensures the pergola operates smoothly year-round, rather than becoming a liability during extreme weather events.
2.. Structural Preparation and Foundation Work
Structural preparation determines whether a commercial pergola performs reliably for decades or develops problems within the first few seasons. Foundation work is not a supporting task—it is the structural backbone of the entire system. For large-span outdoor dining areas, hotel podium decks, or retail walkways, installers must translate design loads into precise concrete work, anchoring systems, and drainage paths before any vertical structure goes up.
On a mixed-use commercial plaza project, improper early drainage planning caused water to collect beneath column bases. The issue only became visible after the first heavy rain, forcing partial disassembly. Proper preparation eliminates this risk entirely.
2.1 Concrete Footing Specifications for Commercial Use
Commercial pergola footings must resist vertical loads, lateral wind forces, and repeated micro-movements from adjustable louvers. Footings sized for residential patios often fail under commercial spans, especially when integrating lighting, motors, and drainage channels typical of a full louvered pergola system.
In practice, contractors follow a clear sequence:
-
Excavate to frost-free depth or structural slab interface, typically 600–900 mm depending on climate.
-
Install compacted gravel layers (minimum 100 mm) to stabilize the base.
-
Pour reinforced concrete with rebar cages tied at 200 mm spacing to control cracking.
-
Finish the top surface level within ±3 mm tolerance to prevent column twist.
For example, a 7 × 5 meter restaurant pergola required four isolated footings, each measuring 500 × 500 × 800 mm, designed to handle wind uplift exceeding 1.6 kN/m². Skipping these specifications almost always leads to long-term settlement or visible column misalignment.
2.2 Anchor Bolts, Base Plates, and Alignment Tolerances
Anchor systems transfer all structural forces into the foundation, so accuracy here matters more than speed. Commercial installers rely on chemical anchors or cast-in-place bolts, not expansion anchors, to achieve consistent pull-out strength and corrosion resistance.
A proven installation workflow includes:
-
Positioning anchor templates during concrete pour to lock bolt spacing.
-
Verifying bolt verticality within 1° deviation using laser alignment tools.
-
Installing steel base plates with shims to correct micro-level differences.
-
Torque-tightening anchors to manufacturer values, often 80–120 Nm for M16 bolts.
On a corporate campus project using a large-span aluminum pergola with integrated motors, a 4 mm base plate deviation caused louver binding during operation. The issue disappeared once alignment returned within tolerance. This is especially critical for systems incorporating automated blade rotation, where mechanical precision directly affects long-term motor life.
2.3 Drainage Planning Before Structure Assembly
Drainage planning must happen before columns and beams lock the structure in place. Once assembly starts, drainage corrections become expensive and visually disruptive. Commercial pergolas typically integrate internal gutter channels that direct water through column downpipes into site drainage systems.
Effective planning focuses on three non-negotiables:
-
Setting a minimum roof slope of 1–1.5% toward drainage outlets.
-
Aligning column bases with existing stormwater or trench drains.
-
Reserving clearance inside columns for concealed downpipes without reducing structural strength.
In one hotel courtyard installation, designers coordinated drainage exits directly into planter drains, eliminating visible pipes while handling rainfall rates over 90 mm/hour. When projects involve motorized louvers and integrated lighting, clean drainage routing also protects electrical components from long-term moisture exposure.
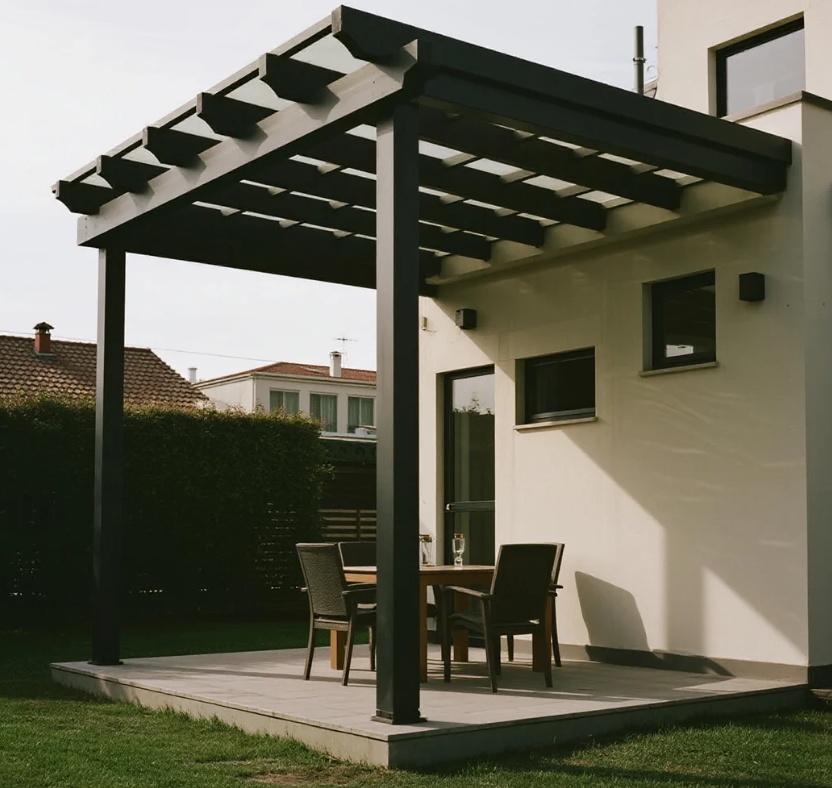
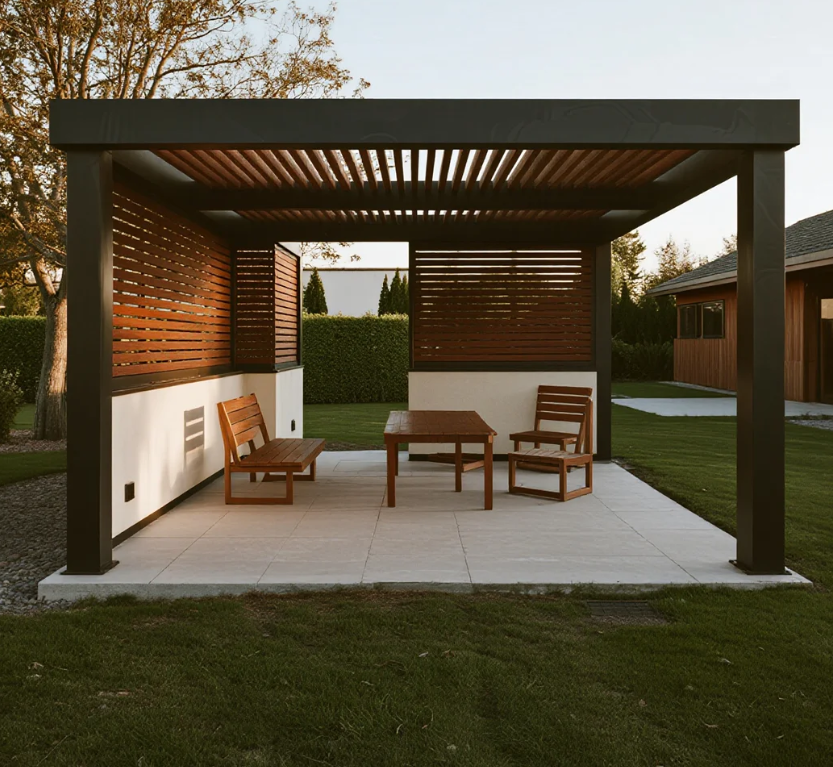
3. Frame Assembly and Column Installation
Frame assembly marks the point where tolerances stop being theoretical and start showing up in real metal. Once columns and beams lock together, every earlier millimeter matters. In commercial projects—restaurants, resorts, retail corridors—this stage determines whether the structure stays square under load or slowly twists over time.
On a 6 × 8 meter outdoor dining project, installers completed frame assembly in one day, but spent nearly the same time rechecking alignment. That extra time prevented long-term blade jamming and uneven stress on fasteners once the roof system went live.
3.1 Column Positioning and Vertical Alignment
Column placement sets the geometry for the entire system. If the columns drift, everything above them compensates—and mechanical parts always lose that fight. Commercial installers rely on both layout control and real-time measurement.
A disciplined positioning process looks like this:
-
Mark column centerlines directly from foundation reference points, not edge measurements.
-
Dry-fit columns onto base plates and hand-tighten anchors.
-
Check vertical plumb in two directions using laser or digital level.
-
Shim at the base plate until deviation stays within ±2 mm over 3 meters.
-
Final-torque anchor bolts only after beam dry-fit confirms alignment.
On a rooftop installation using a large-span louvered pergola system, a single column leaned just 3 mm off plumb. That small error caused uneven load transfer once beams connected, forcing a full reset. Perfect vertical alignment at this stage saves hours later.
3.2 Beam Connection Methods and Fastening Standards
Beam connections handle combined vertical load, wind shear, and torsion from rotating louvers. Commercial standards demand mechanical consistency, not installer intuition. Most systems use internal steel connectors or concealed brackets to keep clean lines without sacrificing strength.
Installers typically follow this fastening sequence:
-
Seat beams fully into column slots or brackets before inserting bolts.
-
Install bolts finger-tight first to allow micro-adjustment.
-
Verify beam-to-column squareness using diagonal measurements.
-
Torque fasteners in stages, usually 40% → 70% → 100% of rated value.
For aluminum structures with integrated motors, uneven torque creates stress points that shorten component life. Consistent fastening protects both structure and automation hardware, especially in systems designed for frequent opening and closing cycles.
3.3 Structural Leveling and Load Distribution Checks
After frame assembly, leveling becomes a structural—not cosmetic—task. A level frame distributes loads evenly across columns and foundations, preventing long-term fatigue.
Experienced crews run three checks:
-
Longitudinal beam level across the full span, tolerance ≤3 mm.
-
Cross-span level between opposing beams.
-
Load simulation by applying temporary downward force to confirm even deflection.
On a hospitality project using an aluminum motorized pergola for an open-air lounge, installers detected uneven load sharing during this check. One column carried nearly 18% more load than the others due to minor beam twist. Correcting it before roof installation avoided premature motor wear and noise during operation.
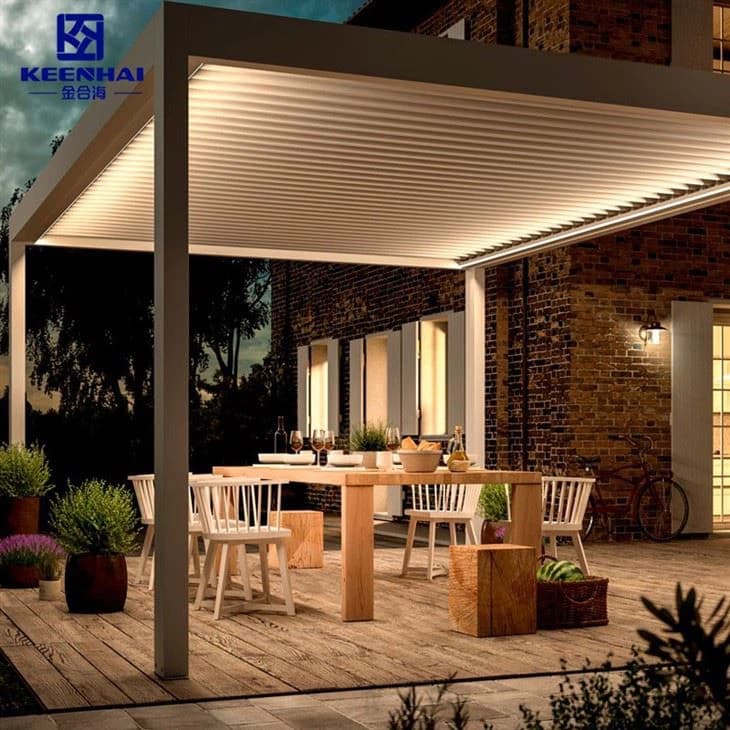
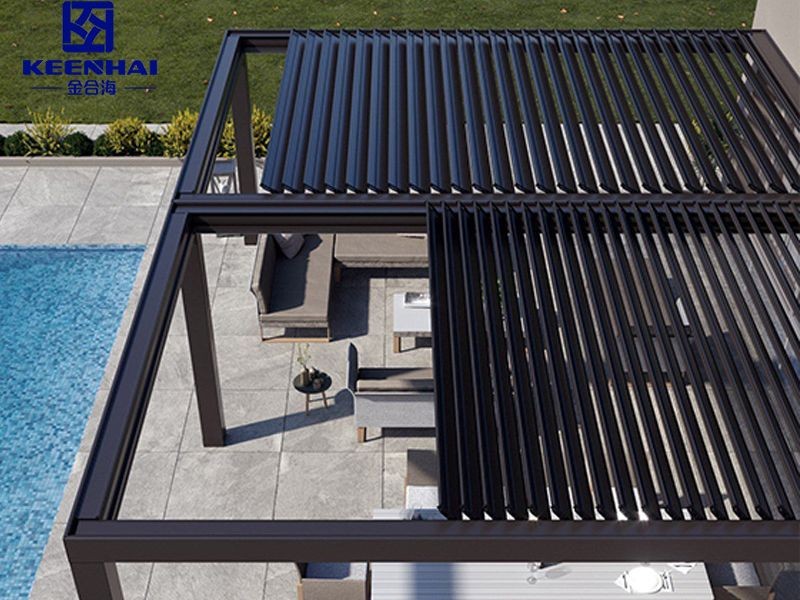
4. Louver System Installation and Adjustment
The louver system defines how a pergola actually performs in daily use. If blades install out of sequence or angles drift by just a few degrees, drainage efficiency drops, motors strain, and users notice noise immediately. In commercial environments—cafés, hotel terraces, retail walkways—this stage separates a premium structure from one that feels unreliable within the first year.
On a 7 × 5 meter commercial terrace using a full louvered pergola system, installers completed structural work in two days, but dedicated nearly a full day to blade installation and adjustment alone. That time investment ensured consistent rotation across all spans and eliminated post-install callbacks.
4.1 Louver Blade Installation Sequence
Blade installation follows a strict order because each blade influences the next. Skipping sequence discipline almost always creates binding at the drive side. Commercial systems typically use interlocking aluminum blades with hidden pins or shafts.
A reliable installation sequence looks like this:
-
Start from the motor or drive side, not the free end.
-
Insert the first blade and confirm full engagement with the drive bar.
-
Install subsequent blades one by one, checking lateral spacing after every 3–4 units.
-
Maintain uniform gaps, usually 2–3 mm, to allow thermal expansion.
-
Secure end caps only after all blades rotate freely by hand.
On wide-span installations exceeding 6 meters, teams often pre-align blades on the ground before lifting. This reduces overhead adjustment time and prevents micro-twists that affect rotation later.
4.2 Angle Calibration and Smooth Rotation Testing
Once blades sit in place, angle calibration determines how effectively the roof handles sun, airflow, and rain. Commercial-grade louvers typically operate between 0° and 135°, but real-world performance depends on precise stop points.
Installers fine-tune rotation in this order:
-
Fully close blades and check for light leaks along seams.
-
Set the closed-angle stop so blades seal without overlapping.
-
Open to mid-angle (45–60°) and verify uniform spacing visually.
-
Cycle fully open and closed at least 5 consecutive times to confirm smooth motion.
On a hospitality project using an aluminum motorized pergola roof, a 4° mismatch across blades caused uneven water runoff during rain. Correcting angle calibration restored proper drainage and eliminated water streaking along the beams. Small angular errors create visible performance issues fast.
4.3 Manual vs Motorized Louver Integration
Manual and motorized systems share the same structural logic, but integration requirements differ significantly. Manual systems depend on mechanical balance, while motorized systems demand electrical and mechanical harmony.
Key integration differences include:
-
Manual louvers require consistent resistance across all blades to avoid uneven hand force.
-
Motorized systems rely on synchronized torque; imbalance increases motor load and noise.
-
Drive components must align within ±1 mm to prevent long-term wear.
In high-traffic commercial spaces, motorized integration delivers predictable operation and user convenience, especially when paired with sensors or timed control. When integration is correct, the system feels effortless—no jerks, no hesitation, no sound cues that something is wrong.
5. Electrical, Control, and Accessory Integration
Integrating electrical and control systems is a critical step in commercial louvered pergola installations. Proper planning ensures safety, minimizes maintenance headaches, and allows full functionality of motorized or smart louvered systems. Poor integration can lead to uneven operation, sensor errors, or increased downtime. In high-traffic areas, every extra hour of troubleshooting affects both operations and customer experience.
5.1 Power Supply Planning for Commercial Sites
Before running cables, engineers assess the load requirements for motors, lighting, and accessories. Commercial sites often require multiple circuits to prevent overloads, with 16–20 A lines commonly used for mid-size pergola systems. Planning includes:
-
Verifying site amperage capacity with a certified electrician.
-
Designing separate circuits for lighting, motor drives, and optional sensors.
-
Ensuring proper grounding to prevent electrical faults.
-
Routing cables through protective conduits to prevent weather or pedestrian damage.
For example, a 6 × 5 meter motorized louvered pergola installed on a hotel rooftop included three dedicated circuits, one for the drive motors, one for LED perimeter lighting, and one for sensors and future add-ons. This configuration prevented power dips during peak operation hours. Commercial-grade electrical planning always anticipates future expansions.
5.2 Control System Wiring and Controller Placement
The control system coordinates manual switches, remote controls, or smart automation. Placement and wiring affect reliability and user experience. Key considerations:
-
Position controllers within 2 meters of primary access points for staff convenience.
-
Keep wiring runs short and shielded to reduce interference with sensor signals.
-
Label circuits clearly to allow quick diagnostics.
-
Test communication between controllers, motors, and any connected automation devices before securing wiring.
For larger projects using a motorized aluminum pergola, integrating wireless controls into the existing building network helped minimize additional conduit runs while maintaining robust operation. Correct controller placement and wiring drastically reduces operational errors and troubleshooting time.
5.3 Lighting, Drainage, and Sensor Installation
Lighting, drainage, and environmental sensors complement both aesthetics and functionality. LED strips, perimeter lights, and embedded rain sensors all require careful integration to avoid performance issues. Steps include:
-
Mount sensors at a 3–4 meter height, angled to detect precipitation or wind without interference from blades.
-
Install drainage channels aligned with blade pitch to ensure water flows away efficiently.
-
Wire lighting circuits to separate switches or smart controllers for flexible operation.
-
Verify sensor and light operation through multiple cycles, confirming response time and automation accuracy.
In commercial terraces, this integration transforms the pergola into a responsive, safe, and comfortable space. A louvered pergola equipped with integrated drainage, lighting, and sensors operates smoothly through rain, sun, and evening service periods, adding value to the property without manual adjustments.