

1. Planning and Site Preparation
Proper planning and site preparation are critical for a successful Aluminum Solar Carport installation. Spending time upfront ensures the carport fits your space, accommodates vehicles, and captures maximum sunlight. A poorly planned site leads to costly adjustments later, so focus on space, soil, and layout before lifting a single beam.
1.1 Assess Available Space and Vehicle Requirements
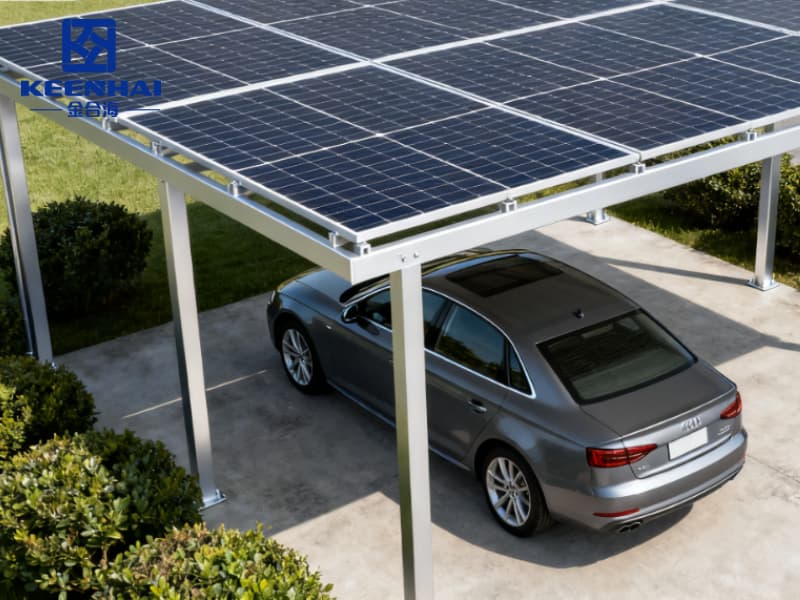
Before installing, measure your driveway or backyard area carefully. Consider the number and size of vehicles you’ll park—from compact cars to SUVs or trucks—and whether you need a multi-vehicle setup. For instance, a Multi-car Solar Carport allows two to four vehicles without crowding.
Key points to check:
-
Width and Length – Measure total parking space plus clearance for opening doors and walking paths.
-
Height Clearance – Ensure the carport frame allows for taller vehicles like vans or roof racks.
-
Future Expansion – Leave extra room if you plan to add EV chargers or additional vehicles.
Clearly, assessing your vehicle size first will save headaches later.
1.2 Check Ground Level and Soil Conditions
A level and stable ground is essential to prevent structural stress. Start by:
-
Inspecting Slope – Use a laser level or long spirit level to check for uneven surfaces. Adjust slopes if drainage is poor.
-
Testing Soil Firmness – Sandy or loose soil may require reinforced footings or concrete pads.
-
Drainage Considerations – Avoid low spots where water pools; proper drainage prevents corrosion and keeps the aluminum frame stable.
For example, in a suburban backyard project, slight grading of 3–4 inches over 20 feet allowed proper drainage and reduced future maintenance. Clearly, ignoring ground conditions leads to both safety risks and energy inefficiency.
1.3 Mark Layout and Set Reference Points
Once the area is measured and leveled, outline the carport footprint. This ensures accurate placement of posts and panels:
-
Mark Corners – Use stakes and string to define the perimeter.
-
Identify Post Locations – Measure spacing according to kit or custom design requirements.
-
Check Alignment – Use a square and level to verify corners and straight lines before digging or pouring footings.
Imagine a homeowner preparing for a Freestanding Solar Aluminum Carport: marking corners precisely allowed the crew to assemble the frame in under two days with perfect alignment. Clearly, setting accurate reference points upfront prevents costly repositioning later.
2. Selecting the Right Aluminum Solar Carport Kit or Custom Design
Choosing the right Aluminum Solar Carport involves balancing installation complexity, durability, and solar efficiency. A smart choice ensures your carport performs well, fits your property, and delivers reliable energy output for years. Focusing on kit vs custom, frame specs, and panel compatibility prevents costly adjustments later.
2.1 Choose Between Pre-Fabricated Kit and Custom Build
Deciding between a pre-fabricated kit and a fully custom design depends on your timeline, property constraints, and desired features:
-
Pre-Fabricated Kits – These come with pre-cut aluminum beams, labeled hardware, and pre-drilled holes. Installation usually takes 1–3 days for a single-car setup. Kits work well for standard driveways and homeowners with moderate DIY skills.
-
Custom Builds – Tailored dimensions, unique roof styles, or unusual property layouts often require professional assembly. Lead times range from 2–6 weeks depending on complexity. Custom builds can integrate with landscaping and offer advanced features like multi-vehicle coverage or higher panel loads.
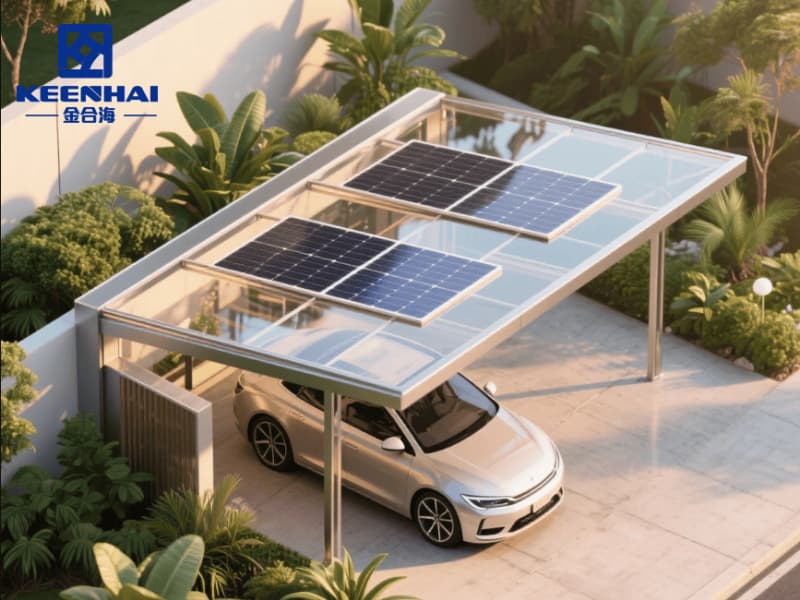
For example, installing a Custom Solar Aluminum Carport allowed a suburban homeowner to fit two SUVs under a curved roof with optimized panel tilt for sunlight. Clearly, the right choice depends on property constraints and project goals.
2.2 Verify Frame Specifications and Load Capacity
Frame strength is crucial for durability, wind resistance, and panel support. When checking frame specifications:
-
Aluminum Grade – Look for 6061-T6 or 6005-T5 for high strength and corrosion resistance.
-
Column and Beam Dimensions – Ensure posts can handle both the weight of solar panels and environmental loads like snow or wind.
-
Load Ratings – Confirm manufacturer-specified maximum panel weight per square foot; multi-car carports require higher load capacity.
| Frame Parameter | Typical Range | Notes |
|---|---|---|
| Aluminum Alloy | 6061-T6 / 6005-T5 | High corrosion resistance and strength |
| Beam Size | 3–6 inches width | Wider beams support heavier panels |
| Load Capacity | 50–120 lbs/sq ft | Depends on snow/wind region |
Clearly, verifying specs upfront prevents structural failure and ensures long-term performance.
2.3 Confirm Solar Panel Compatibility
Not all panels fit every carport frame. Key factors include:
-
Panel Size and Weight – Check that your frame supports the panel dimensions and total weight, especially for larger monocrystalline panels.
-
Mounting Style – Ensure racking systems and attachment points align with your chosen roof type (flat, sloped, or curved).
-
Electrical Considerations – Confirm spacing for wiring and inverter connections without compromising structural integrity.
For instance, a homeowner paired a freestanding unit with 12 high-efficiency panels on a sloped roof. Spacing and mounting adjustments allowed maximum sunlight capture and minimized shading. Clearly, confirming compatibility prevents wasted time and ensures peak energy output.

3. Foundation and Ground Anchoring
A strong foundation is the backbone of a durable Aluminum Solar Carport. Without proper anchoring, even the best frames and panels risk instability and long-term damage. Focusing on foundation type, excavation, and secure attachment ensures your carport withstands wind, snow, and everyday use.
3.1 Determine Foundation Type: Concrete Slab vs Anchors
Choosing the right foundation depends on your property, soil, and load requirements:
-
Concrete Slab – Ideal for permanent installations on flat surfaces. A 4–6 inch thick slab with rebar reinforcement provides superior stability for single or multi-car setups. It also simplifies leveling and prevents shifting over time.
-
Ground Anchors – Best for softer soil or temporary installations. Screw-in anchors or anchor plates can support most freestanding carports and are less invasive than concrete.
| Foundation Type | Ideal For | Pros | Cons |
|---|---|---|---|
| Concrete Slab | Permanent, high-load | Extremely stable, long-lasting | More expensive, requires curing |
| Ground Anchors | Soft soil, semi-permanent | Quick installation, less disruptive | Slightly less stability, may shift |
Clearly, selecting the right foundation upfront prevents alignment issues and structural problems later.
3.2 Excavate and Level Ground
Once the foundation type is chosen, prepare the ground carefully:
-
Excavate – Remove topsoil and debris to the required depth based on slab or anchor design. Typically, 6–8 inches is sufficient for anchors; 8–12 inches for slabs.
-
Level – Use a laser level or long spirit level to check for uniform height. Uneven ground can compromise frame alignment and panel tilt efficiency.
-
Compact Soil – For anchors, compact soil with a mechanical plate compactor to maximize holding strength.
For example, a suburban homeowner installing a freestanding carport compacted the soil over two days and verified level with a laser; this step avoided misalignment when the frame was lifted. Clearly, proper excavation and leveling is non-negotiable for long-term performance.
3.3 Install Anchor Bolts and Base Plates
The final step ensures your carport is securely fastened:
-
Position Base Plates – Align with your layout markings, ensuring spacing matches your frame specifications.
-
Install Anchor Bolts – For concrete slabs, embed anchor bolts while the slab cures; for ground anchors, screw or drive into compacted soil.
-
Check Alignment and Plumb – Before attaching columns, verify all bolts and plates are level and square. Misalignment here leads to uneven roofs or panel shading.
A multi-car setup used anchor bolts embedded in a freshly poured slab, allowing rapid frame installation the next day. Clearly, skipping precision in this step compromises the stability and safety of the entire carport.
4. Frame Assembly
Assembling the frame is the point where your Aluminum Solar Carport starts to take shape. Precise assembly ensures stability, durability, and alignment for both the roof and solar panels. Skipping steps or rushing leads to crooked beams or misaligned panels, which can compromise energy efficiency and safety.
4.1 Assemble Columns and Beams
Start with the vertical columns, which form the backbone of your carport:
-
Identify Columns and Beams – Organize all parts by size and label according to manufacturer instructions.
-
Lift and Position Columns – Place each post on its base plate or anchor bolt, ensuring the bottom fits snugly. Use a temporary support if needed.
-
Attach Beams – Secure horizontal beams to the top of columns using bolts or brackets, following the specified torque values.
For a Freestanding Solar Aluminum Carport installation, pre-assembling beams on the ground before lifting reduced alignment errors and made bolting faster. Clearly, starting with properly positioned columns guarantees the rest of the frame will align correctly.
4.2 Secure Cross Braces and Roof Supports
Cross braces stabilize the frame and prevent twisting:
-
Install Diagonal Braces – Connect diagonal supports between columns and beams to resist lateral movement.
-
Attach Roof Supports – Position roof rafters or trusses according to the chosen style (flat, sloped, or curved). Ensure each connection is tight and level.
-
Double-Check Connections – Verify all nuts and bolts are secure, and hardware matches manufacturer specifications.
A suburban multi-car setup used additional diagonal braces to handle heavy winter snow loads, and the roof support alignment ensured panels would sit flush. Clearly, securing braces and supports prevents structural wobble and panel misalignment.
4.3 Verify Plumb and Level Alignment
Accuracy here is crucial for both aesthetics and solar efficiency:
-
Use a Spirit Level or Laser – Check each column is perfectly vertical (plumb) and beams are horizontal.
-
Adjust Before Tightening – Minor adjustments now prevent uneven roofs and shading issues later.
-
Confirm Corner Squareness – Ensure all corners form true right angles; misalignment can distort the entire frame.
In practice, checking plumb and level after partial assembly allowed installers to correct slight tilts before adding panels. Clearly, skipping this verification risks uneven panel orientation and structural strain.

5. Solar Panel Installation and Electrical Setup
Installing solar panels is where your Aluminum Solar Carport starts producing energy. Precise panel mounting, secure wiring, and correct orientation are crucial for maximum efficiency and long-term performance. Skipping steps or misaligning panels can reduce energy output and strain the frame.
5.1 Mount Solar Panels on Aluminum Frame
Proper mounting ensures panels are secure and aligned:
-
Check Panel Type and Orientation – Ensure compatibility with your frame and roof style (flat, sloped, or curved).
-
Install Mounting Rails or Brackets – Align rails with roof beams; use manufacturer-recommended hardware.
-
Attach Panels – Carefully place panels on rails, securing with clamps or bolts. Confirm spacing for thermal expansion.
For example, installing a Multi-car Solar Carport allowed a homeowner to park two SUVs under the structure while simultaneously mounting 12 high-efficiency panels with precise tilt for optimal sunlight. Clearly, proper mounting prevents frame stress and maximizes solar gain.
5.2 Connect Wiring and Inverter
Electrical connections must be safe, accessible, and optimized:
-
Run Conduit and Wiring – Route positive and negative wires along beams, securing them with cable ties or clips to avoid sagging.
-
Connect to Inverter – Match DC inputs from panels to the inverter and confirm proper grounding.
-
Double-Check Polarity and Connections – Miswiring can damage panels or reduce output efficiency.
Homeowners using string inverters often mark each wire connection with color-coded labels for easy maintenance. Clearly, careful wiring reduces risks and ensures consistent energy production.
5.3 Test Power Output and Panel Orientation
Testing confirms installation accuracy and panel performance:
-
Initial Power Test – Use a multimeter or inverter display to verify expected voltage and current.
-
Adjust Panel Tilt if Needed – Minor angle adjustments can increase sunlight capture by 5–15% depending on seasonal sun position.
-
Monitor System Performance – Check output at peak sunlight hours to ensure energy generation aligns with projections.
For instance, after adjusting the tilt by just 5 degrees, one homeowner increased daily output by 1.2 kWh, highlighting the importance of precise orientation. Clearly, testing and fine-tuning maximizes the efficiency of your entire solar setup.