

1.Planning Your Installation
1.1 Measuring and Preparing Your Space
Before installing your aluminum pergola, measure the area carefully. Use a tape measure to check the length, width, and height where the pergola will sit. Make sure to leave extra space around the edges for footings and movement.
-
Clear the area of debris, rocks, or plants that could obstruct installation.
-
Mark the corners using stakes and string to visualize the pergola footprint.
-
Check that the ground is relatively level; uneven areas will require shimming or additional support.
For instance, a homeowner in Los Angeles installed a 12x12 ft aluminum pergola on a rooftop deck. By marking the space with string and double-checking level lines with a laser level, they avoided mistakes that could have caused alignment issues later.
1.2 Checking Local Regulations and Restrictions
Many neighborhoods and cities have rules about outdoor structures. Check your local zoning regulations to confirm:
-
Maximum height allowed for outdoor structures.
-
Distance from property lines or easements.
-
Permit requirements for permanent installations.
In some coastal cities like Miami, homeowners must submit a permit if the pergola exceeds 12 ft in height due to wind codes. Ignoring these rules can lead to fines or forced removal, so verify before buying.
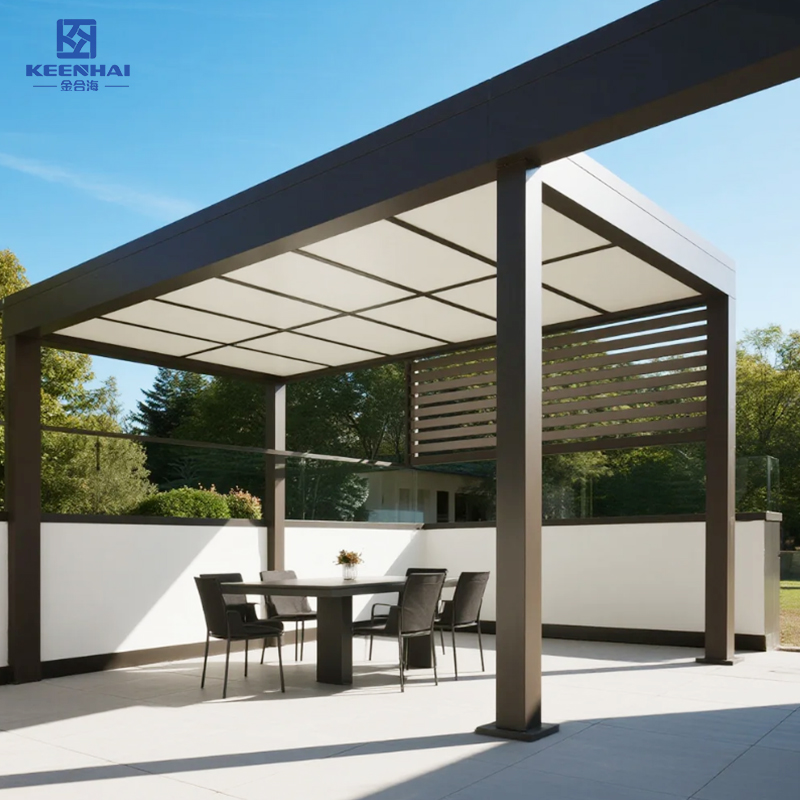
1.3 Choosing the Right Aluminum Pergola Model
Aluminum pergolas come in different styles and strengths. Pick the model that suits your climate, space, and desired features. Consider these factors:
| Feature | Standard Model | Premium Model |
|---|---|---|
| Size Options | Limited, fixed dimensions | Customizable, multiple sizes |
| Roof Type | Fixed panels | Adjustable louvers, retractable |
| Weight | Lightweight | Heavier, supports accessories |
| Cost | $2,000–$3,000 | $3,500–$5,000+ |
For example, a family in Seattle chose a premium model with adjustable louvers to control rain and sunlight. They installed it over their backyard patio, creating an outdoor lounge area that could adapt to different weather conditions. By selecting the right model, they avoided frequent repairs and enhanced usability year-round.
Extra Tips for Planning
-
Consider access points: Make sure the pergola can fit through gates or narrow paths if you buy pre-fabricated pieces.
-
Visualize the layout: Place temporary markers or cardboard cutouts to see how the structure interacts with your garden furniture.
-
Plan for utilities: If you want integrated lighting or fans, think about electrical connections before installation.
By carefully planning the space, checking regulations, and selecting the right model, you set yourself up for a smooth and efficient aluminum pergola installation.
2.Foundation and Ground Preparation
2.1 Selecting the Base Type (Concrete, Deck, or Patio)
Choosing the right base is crucial for a stable aluminum pergola. Concrete footings provide the strongest support, ideal for freestanding pergolas in open gardens. Deck mounting works well for rooftop terraces or patios but requires reinforced beams. Patio slab installation is convenient for existing stone or tile surfaces but may need anchor plates for extra stability.
| Base Type | Best Use Case | Stability | Installation Notes |
|---|---|---|---|
| Concrete Footing | Backyard or open space | High | Dig footings at least 24 inches deep, pour concrete, insert anchors while wet |
| Deck Mount | Rooftop terraces or wood decks | Medium-High | Ensure deck joists can handle weight, use mounting brackets with bolts |
| Patio Slab | Stone or tile patios | Medium | Use surface anchors, may need epoxy or expansion bolts for tight fit |
For example, a homeowner in Austin installed a 10x12 ft aluminum pergola on a concrete pad. They dug four 24-inch footings, poured concrete, and inserted threaded anchors. This created a solid base that resisted heavy Texas winds.
2.2 Leveling and Marking the Installation Area
Leveling the ground ensures the pergola stands straight and prevents water pooling.
-
Use a laser level or spirit level to check elevation across the installation area.
-
Place stakes at the corners and connect with string to visualize the footprint.
-
Adjust high or low spots with sand, gravel, or shims until the surface is level.
In a Boston backyard, the installer added 2 inches of compacted gravel to uneven ground before positioning a 12x12 ft pergola. By checking multiple points with a laser level, the structure aligned perfectly, preventing water from pooling near the posts.
2.3 Installing Anchors and Footings
Anchors and footings lock the pergola to the base and ensure it withstands wind and weather.
-
Mark exact anchor positions according to the pergola’s manual.
-
Drill holes for concrete footings or deck brackets.
-
Insert anchors or bolts securely, using a torque wrench to ensure tightness.
-
Check vertical alignment of each post with a level before final tightening.
For instance, a Miami rooftop pergola installation required sleeve anchors drilled into reinforced concrete. Each post was double-checked for plumb alignment before tightening, ensuring the pergola could handle both sun and storm without movement.
Extra Practical Tips
-
Double-check measurements: Measure twice, drill once. Small mistakes at this stage become major problems later.
-
Keep tools ready: Have a hammer drill, level, tape measure, and wrench nearby to streamline the process.
-
Visualize placement: Use temporary markers or chalk lines to see how the pergola interacts with nearby furniture or walkways.
By selecting the right base, leveling precisely, and securing anchors carefully, you build a foundation that supports a sturdy, long-lasting aluminum pergola ready for assembly.
3.Assembling the Aluminum Pergola Frame
3.1 Organizing Parts and Tools
Before starting assembly, lay out all parts on a flat surface and check against the instruction manual. Organizing components prevents mistakes and saves time. Essential tools usually include:
-
Cordless drill with metal bits
-
Socket wrench set
-
Spirit level or laser level
-
Measuring tape
-
Rubber mallet
For example, a family in Denver spread all aluminum beams, brackets, and screws in the backyard and labeled them by position. This simple step avoided confusion during frame assembly and cut installation time by nearly 30%.
3.2 Step-by-Step Frame Assembly
Follow these steps to assemble your pergola frame safely and efficiently:
-
Attach the base brackets to the anchors installed on the ground or deck.
-
Erect the vertical posts and temporarily secure them with clamps.
-
Connect horizontal beams at the top, ensuring each joint aligns perfectly.
-
Check for plumb and level using a spirit or laser level, adjusting as necessary.
-
Tighten all bolts and screws gradually in a crisscross pattern to ensure even pressure.
In a Boston backyard, installers first clamped posts to the concrete anchors, then connected beams while standing on ladders. By checking vertical alignment at each step, the pergola remained perfectly straight and stable.
3.3 Securing Columns and Beams
Columns and beams form the pergola’s backbone, so secure them carefully:
-
Use high-strength stainless steel bolts provided by the manufacturer.
-
Tighten gradually to avoid bending or misalignment.
-
Recheck each connection with a level after tightening.
| Component | Recommended Fastening Method | Tips for Stability |
|---|---|---|
| Vertical Posts | Anchor bolts in concrete or deck plates | Use clamps to hold plumb during assembly |
| Horizontal Beams | Stainless steel bolts and brackets | Tighten evenly, check alignment periodically |
| Roof Support Beams | Pre-drilled brackets or connectors | Adjust for roof panels before final tightening |
In a Miami rooftop installation, installers secured each post with sleeve anchors and used temporary braces to maintain alignment while connecting beams. The result was a perfectly square frame ready for roof installation, capable of resisting strong coastal winds.
Extra Practical Tips
-
Work with a partner: Lifting beams alone can be unsafe and may bend the aluminum.
-
Follow sequence strictly: Don’t tighten all bolts at once; gradually secure parts to allow slight adjustments.
-
Check frequently: Step back and visually inspect alignment from different angles to catch mistakes early.
By organizing parts carefully, following precise assembly steps, and securing columns and beams correctly, you build a solid aluminum pergola frame ready for roof installation.

4.Roof Installation and Adjustments
4.1 Attaching Fixed or Louvered Roof Panels
The roof defines your pergola’s functionality. Choose between fixed panels for permanent shade or adjustable louvers for flexible sunlight control.
-
Lay out the roof panels near the pergola frame for easy access.
-
Position the first panel on the roof beams, aligning pre-drilled holes.
-
Secure with bolts or screws as instructed, starting at one end and moving sequentially.
-
Repeat for all remaining panels, checking alignment after each placement.
For example, a Seattle homeowner installed a 12x12 ft pergola with louvered panels. They placed each louver carefully to ensure even spacing, allowing smooth rotation to control light and rain. By pre-arranging panels, installation went smoothly in a single afternoon.
4.2 Aligning and Adjusting for Level and Stability
Even a small misalignment can cause roof issues. Check the roof from multiple angles and adjust immediately.
-
Use a laser level to ensure the roof runs evenly across all beams.
-
Adjust brackets or beam positions if necessary to eliminate tilting.
-
Test panel operation for louvers; they should rotate without friction.
In a Boston backyard, installers noticed one panel slightly tilted during placement. They loosened adjacent bolts, realigned the panel, and re-tightened. The roof operated flawlessly, with water draining evenly across all panels.
4.3 Installing Optional Features (Lights, Fans, or Screens)
Many aluminum pergolas support extra features that enhance comfort.
-
Plan electrical connections if adding lights or ceiling fans.
-
Use manufacturer-specified brackets for hanging accessories.
-
Ensure wiring or mounts do not interfere with louver movement or drainage.
A homeowner in Los Angeles installed integrated LED strips along the beams of a 10x12 ft pergola. By carefully routing wiring along beam channels, they achieved a clean look without obstructing louver adjustments.
| Roof Type | Advantages | Ideal Scenario |
|---|---|---|
| Fixed Panels | Permanent shade, less moving parts | Sunny backyard or poolside |
| Louvered Panels | Adjustable sunlight and ventilation | Areas with variable weather |
| Retractable Roof | Maximum flexibility, retractable cover | Rooftop terraces or patios |
Extra Practical Tips
-
Check operation early: Test louvers or retractable panels before final tightening.
-
Work with two people: Roof panels can be heavy and awkward; one person holds while the other bolts.
-
Visual inspection: Step back after installation to ensure panels are evenly spaced and aligned with the frame.
By carefully attaching panels, adjusting alignment, and installing optional features thoughtfully, your aluminum pergola roof will function smoothly and enhance your outdoor living space.