

When budgeting for a custom aluminum patio sunroom, factor in base materials, construction labor, and optional add-ons like blinds or heating. Regional and seasonal pricing differences can shift costs by 10–20%, so early planning and multiple quotes help control expenses. A carefully executed project ensures a sunroom that’s both visually stunning and structurally sound for decades.
1. Design Considerations for Aluminum Patio Sunrooms
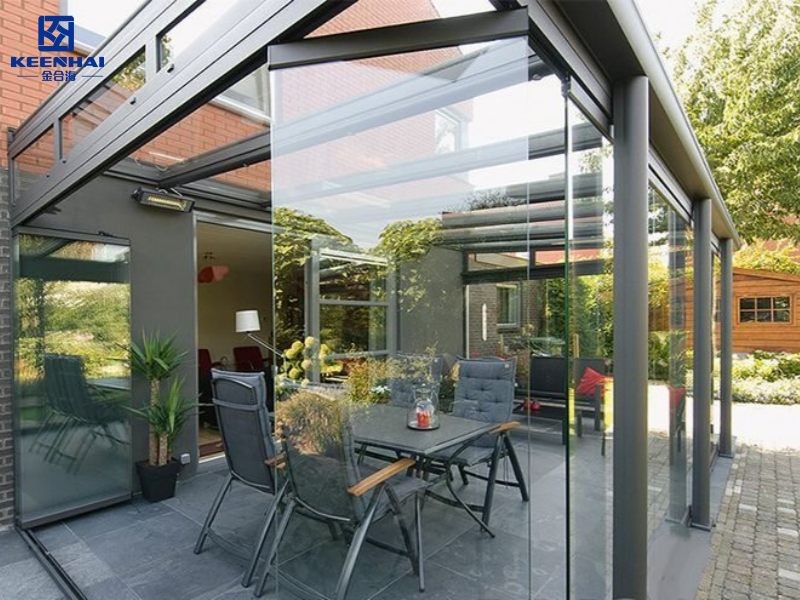
Designing your Aluminum Patio Sunroom requires careful planning to make the space functional and stylish. Start by analyzing your backyard layout, sunlight patterns, and how you intend to use the room. A well-planned layout ensures the sunroom complements your home, maximizes natural light, and creates a comfortable environment.
1.1 Layout and Space Planning
Planning your sunroom layout involves clear, actionable steps:
-
Measure the available space accurately. Take note of walls, windows, doors, and any obstacles. This ensures the sunroom fits perfectly without crowding your yard.
-
Observe sunlight patterns throughout the day. Place seating areas where morning sun is pleasant and avoid harsh afternoon glare.
-
Define functional zones. Decide where you want a dining area, reading nook, or lounging space.
-
Plan for furniture and circulation. Ensure there’s at least 3 feet of walking space between furniture and walls.
-
Consider energy efficiency. Position windows and openings to promote natural ventilation, reducing reliance on artificial cooling.
Following these steps guarantees a layout that balances comfort, functionality, and aesthetics.
1.2 Roof Styles and Glass Options
Selecting the right roof and glass type affects both style and comfort. Consider these steps:
-
Choose a roof style: Options include flat, gabled, or sloped. Each has advantages in water drainage, snow load, and aesthetic appeal.
-
Select glass panels: Decide between clear, tinted, or insulated glass to control sunlight, heat, and UV exposure.
-
Evaluate structural support: Heavier glass or complex roof styles may require reinforced aluminum frames.
| Roof/Glass Option | Benefits | Considerations |
|---|---|---|
| Flat Roof + Clear Glass | Modern look, max light | Requires stronger support for snow load |
| Gabled Roof + Tinted Glass | Classic style, reduces glare | Slightly higher cost |
| Sloped Roof + Insulated Glass | Energy-efficient, prevents condensation | Heavier, professional installation recommended |
By following these steps, your aluminum sunroom remains comfortable year-round while reflecting your personal style.
1.3 Color, Finish, and Aesthetic Customization
Customizing colors and finishes is crucial for a polished appearance:
-
Choose a powder-coated finish. This protects the frame from corrosion and keeps it looking new for decades.
-
Select frame color. Popular options include classic white, black, or metallic shades that complement your home exterior.
-
Add decorative elements. Integrate trims, moldings, or blinds to enhance aesthetics.
-
Match interior style. Ensure furniture, flooring, and lighting coordinate with your aluminum sunroom for a cohesive look.
By carefully planning these aspects, your aluminum patio sunroom becomes a stylish, durable, and low-maintenance outdoor space.

2. Material and Frame Options
Choosing the right materials for your sunroom is crucial for durability, aesthetics, and long-term value. Aluminum Patio Sunroom frames are lightweight, resistant to corrosion, and low-maintenance compared to wood or steel. Selecting the correct alloy and quality grade ensures your sunroom can withstand weather extremes and last for decades.
2.1 Aluminum Alloy Types and Quality Grades
When selecting aluminum frames, follow these steps for optimal results:
-
Identify the alloy type. Common choices are 6061 and 6063 alloys. 6061 offers high strength and durability, while 6063 is easier to extrude and ideal for decorative profiles.
-
Check the temper or hardness rating. T6 temper provides excellent strength and rigidity, while softer temper alloys may flex under load.
-
Inspect surface treatments. Powder coating or anodizing adds corrosion resistance and extends lifespan.
-
Evaluate manufacturer certifications. Look for ASTM or ISO standards to ensure quality and consistency.
By carefully considering these factors, your aluminum sunroom remains structurally sound and visually appealing over time.
2.2 Comparison with Other Frame Materials
Choosing between aluminum and other frame materials depends on your priorities, such as strength, maintenance, and aesthetics. The table below highlights key differences:
| Material | Durability | Maintenance | Cost | Weather Resistance |
|---|---|---|---|---|
| Aluminum | High | Low | Moderate | Excellent |
| Wood | Moderate | High (requires sealing/painting) | Moderate-High | Susceptible to rot/insects |
| Steel | Very High | Moderate (rust prevention needed) | High | Good with proper coating |
Compared to wood and steel, aluminum frames deliver a superior balance of strength, low maintenance, and weather resistance. For homeowners seeking longevity with minimal upkeep, aluminum sunrooms often outperform traditional wooden alternatives.
3. Cost Breakdown and Pricing Factors
Understanding the costs of an Aluminum Patio Sunroom helps homeowners plan budgets and avoid surprises. Pricing depends on multiple elements including base materials, construction complexity, optional features, and regional factors. By breaking down each component, you can make informed choices and maximize value.
3.1 Base Material and Construction Costs
The foundation of cost begins with materials and construction:
-
Frame and glass selection. Premium alloys and insulated glass increase durability but raise costs. Standard options are more affordable but may have lower thermal efficiency.
-
Size and dimensions. Larger sunrooms require more aluminum, glass, and labor, directly impacting the base price.
-
Labor and installation. Skilled installation ensures structural integrity and long-term performance. Depending on complexity, labor can account for 20–35% of the total cost.
A typical 12x12 aluminum patio sunroom can start around $8,000 for standard materials, but customized configurations with premium glass or roofing can exceed $20,000.
3.2 Optional Features and Accessories
Optional upgrades allow you to enhance comfort, style, and functionality. Consider the following steps:
-
Select roof and glazing upgrades. Options like UV-protective, tinted, or laminated glass improve energy efficiency and reduce glare.
-
Add functional accessories. Ceiling fans, LED lighting, retractable blinds, and heating units elevate usability.
| Feature | Added Cost | Benefits |
|---|---|---|
| Insulated Glass Panels | $800–$1,500 | Better energy efficiency, reduced condensation |
| Retractable Blinds | $300–$700 | Sunlight control and privacy |
| Ceiling Fans or Lighting | $200–$600 | Comfort and ambiance |
| Radiant Heating | $1,000–$2,500 | Year-round usability |
Carefully selecting upgrades ensures your aluminum sunroom balances cost with long-term enjoyment.
3.3 Regional and Seasonal Price Variations
Location and timing influence cost significantly:
-
Regional labor and material pricing. Urban areas often have higher labor rates and shipping costs, while rural regions may see savings.
-
Seasonal demand. Installing in spring or summer can be more expensive due to high demand; fall or winter installations sometimes come with discounts.
-
Local building codes and permits. Certain regions may require specialized anchoring or additional inspections, adding to overall expenses.
By considering these factors, you can strategically plan construction to reduce costs without compromising quality.
4. Installation Tips and Best Practices
Proper installation ensures your aluminum sunroom performs optimally and lasts decades. Paying attention to foundation, labor choices, and step-by-step procedures can prevent costly mistakes and improve long-term satisfaction.
4.1 Site Preparation and Foundation Requirements
A solid foundation is critical for stability and longevity:
-
Assess the location. Ensure the area is level and free from debris, tree roots, or slopes that may affect drainage.
-
Choose the foundation type. Options include concrete slab, deck attachment, or reinforced footings depending on soil type and local building codes.
-
Prepare for drainage. Install slight slopes or French drains to prevent water pooling near the sunroom edges.
-
Mark precise measurements. Use stakes and strings to outline exact footprint, allowing for any overhangs or eaves.
By meticulously preparing the site, you minimize future settlement or alignment issues, ensuring the structure remains straight and secure.
4.2 Professional Installation vs DIY Considerations
Deciding between professional installers and a DIY approach affects costs, timeline, and quality:
-
Professional installation benefits:
-
Guaranteed structural integrity and precise alignment
-
Knowledge of local building codes and permits
-
Access to specialized tools for cutting and assembly
-
-
DIY considerations:
-
Can save 15–25% on labor costs
-
Requires experience with heavy materials and construction
-
May increase risk of errors, leading to higher long-term repair costs
-
Most homeowners find professional installation worth the investment, especially for larger or custom aluminum sunrooms, ensuring long-term performance and minimal maintenance headaches.
4.3 Timeline and Step-by-Step Installation Overview
Installation generally follows these steps, with a typical timeline of 5–10 days for a standard 12x12 sunroom:
-
Day 1–2: Foundation and site prep
Level the site, pour concrete slab or set footings, and allow proper curing. -
Day 3–4: Frame assembly
Assemble the aluminum frame panels, check alignment, and anchor securely to the foundation. -
Day 5–6: Glass and roofing installation
Fit insulated glass panels, install roof modules, and seal edges with weatherproof caulk. -
Day 7–8: Accessories and finishing touches
Install blinds, lighting, or heating units; check all doors and windows for smooth operation. -
Day 9–10: Final inspection and cleanup
Inspect structural integrity, ensure all fasteners are tight, and clean glass surfaces.
Following this step-by-step approach reduces errors and ensures the sunroom looks polished and functions flawlessly.

5. Maintenance and Longevity
Maintaining your aluminum sunroom ensures it remains functional and visually appealing for decades. Regular care, proactive corrosion prevention, and understanding warranty coverage are essential to protect your investment.
5.1 Cleaning and Upkeep Tips
Routine cleaning keeps surfaces pristine and prevents deterioration:
-
Wash aluminum frames monthly with mild detergent and water to remove dirt, pollen, and debris. Avoid abrasive cleaners that can scratch surfaces.
-
Clean glass panels regularly to maintain clarity and UV protection. Use a soft squeegee or microfiber cloth.
-
Check seals and caulking every 6 months. Replace any cracked or loose seals to maintain weatherproofing.
-
Lubricate moving parts like sliding doors and windows twice a year to ensure smooth operation.
By following these steps, you can maintain both the appearance and functionality of your sunroom while extending its lifespan.
5.2 Preventing Corrosion and Wear
Aluminum is highly resistant to rust, but preventive care improves longevity:
-
Inspect for scratches or dents that expose raw metal. Touch up with paint or protective coatings immediately.
-
Avoid water pooling near joints or edges by ensuring proper drainage.
-
Minimize contact with harsh chemicals such as salt or strong cleaners that can degrade finish over time.
-
Check fasteners and anchors annually to ensure stability, especially after storms or high winds.
These proactive measures reduce wear and tear, keeping your aluminum sunroom sturdy and visually appealing for years.
5.3 Warranty and Long-Term Performance
Understanding warranty coverage helps you plan long-term maintenance:
-
Review manufacturer warranties for frame, glass, and coatings; typical aluminum sunrooms carry 10–20 years on structural components.
-
Register your sunroom with the manufacturer to ensure coverage and access to support.
-
Keep maintenance records. Document cleaning, inspections, and repairs to simplify claims if needed.
-
Invest in professional inspections every 3–5 years to catch minor issues before they escalate.
A well-maintained sunroom paired with warranty protection can easily exceed 30 years of reliable service, making it a cost-effective, long-term addition to your home.
Investing in a premium aluminum patio sunroom combines style, durability, and practicality. From thoughtful design and quality materials to professional installation and regular maintenance, every detail contributes to long-term satisfaction. By planning carefully and following the tips above, you ensure your sunroom becomes a comfortable, bright extension of your home that lasts for decades.